Capturing a massive, glowing iceberg or a sprawling glacial fjord on your camera sensor is only half the battle. When you open your RAW files at the end of a long day of excursions in Zodiac boats, you will likely face a disheartening reality: your images look flat, muddy, and overwhelmingly blue.
This isn’t a failure of your gear. Digital sensors are engineered to record raw, uncompressed data, and they easily get tricked by the intense UV glare, massive white expanses, and subtle light shifts of the polar regions. A RAW file shot under an overcast sky in the South Shetland Islands will naturally look lifeless without deliberate post-processing.
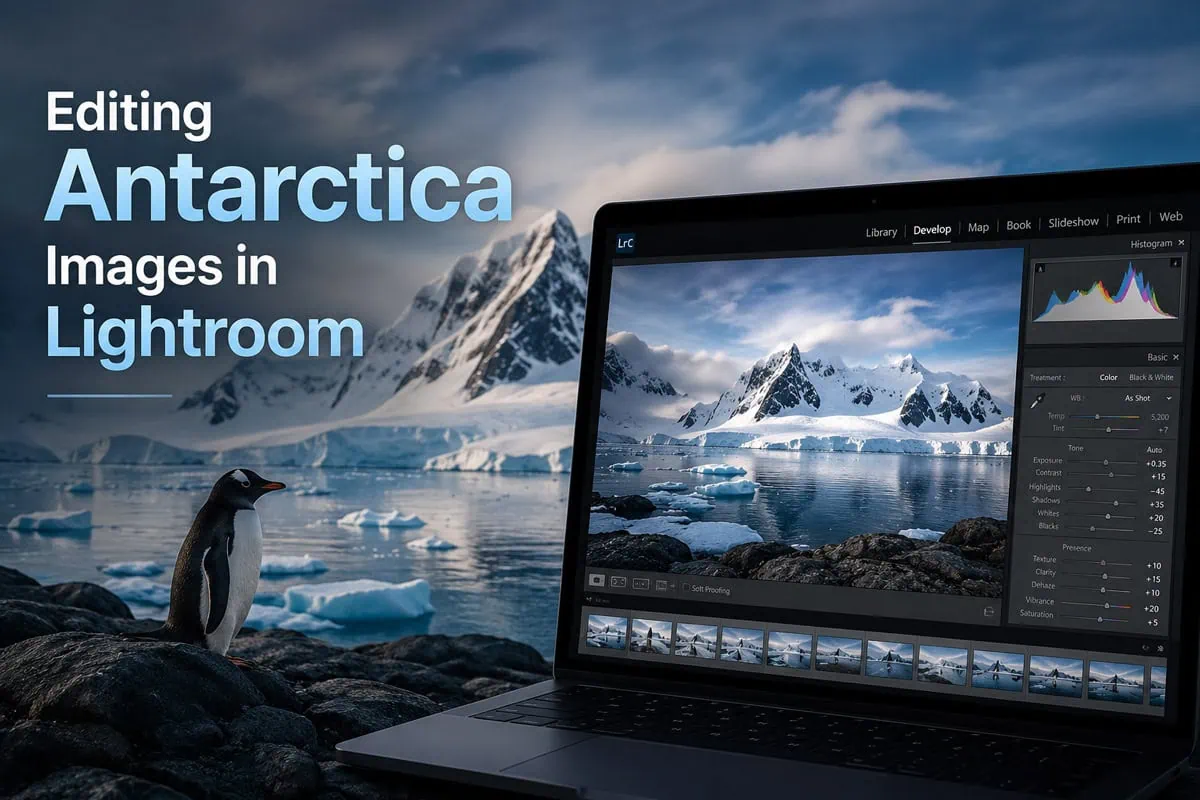
Mastering the art of editing Antarctica images in Lightroom requires a delicate, highly specific workflow. If you push the sliders too far, your pristine white snow packs will look artificially gray or radioactive; if you don’t push them enough, the true majesty of the landscape is lost. This guide breaks down the essential Adobe Lightroom techniques to neutralize color casts, recover hidden textures, and make your polar portfolio match the grandeur of what you actually saw on the ice.

1. Balancing White Balance and Tint
The single greatest hurdle when editing Antarctica images in Lightroom is managing the color blue. The white snow acts like a giant mirror that distorts the color temperature. On cloudy days, the diffused light creates a cool blue cast that envelops the snow-covered fields and reduces the contrast of the subjects, making them blend into the background.
The Global Correction Trap: If you use the global White Balance Eyedropper on the snow to remove the blue, Lightroom pumps yellow into the entire frame. This turns your crisp snow muddy and completely kills the authentic, vibrant turquoise tones hiding inside the deep cracks of your icebergs.
The Range Mask Solution (Color or Luminance): Instead of using global adjustments, create a local mask over the foreground snow using a Luminance Range Mask or Color Range Mask. By targeting only the brightest highlights (the snow) or the specific pale blue of the reflections, you can independently drop the temperature only where the light is bouncing. This leaves the deeply saturated, high-density blues embedded deep within the glacial ice completely untouched and vibrant.
2. Precision Masking for Blown-Out Skies
Because the contrast between a dark ocean, dark volcanic rock, and blinding white snow is so extreme, your camera’s histogram will often be pushed to its absolute limits. Frequently, a beautifully exposed glacier will leave you with a flat, bright, or completely blown-out sky.
The Power of ‘Select Sky’: Utilize Lightroom’s AI-driven masking tools to isolate the sky instantly. Instead of dragging down the global exposure—which will make your foreground snow muddy—apply a specific Sky Mask.
Recovering Dramatic Cloud Formations: Once the sky is masked, pull down the Highlights slider and gently decrease the Exposure (-0.30 to -0.75). To bring out the heavy, brooding mood of an approaching Antarctic storm, add a touch of Dehaze or Clarity strictly to the sky mask. This creates a dramatic, textured backdrop that makes your white and blue icebergs pop out of the frame.

3. Pulling Texture from the Highlights: Foreground Masking
When you look closely at a glacier in person, you see thousands of tiny ridges, geometric crevasses, and patterns sculpted by the wind. However, in an unprocessed RAW file, this wide tonal range doesn’t stand out; those delicate textures are lost in a flat, white mass devoid of contrast.
The Foreground Radial or Linear Gradient: Create a linear gradient mask starting from the bottom of your frame and dragging upward across the foreground snow.
Micro-Contrast Enhancements: Within this specific foreground mask, slightly lower the Highlights to reveal the hidden data near the right side of your histogram. Then, incrementally increase the Texture and Whites sliders. Increasing the Texture enhances the fine grit of the snow pack without adding harsh digital noise, while boosting the Whites ensures the landscape maintains its brilliant, crisp luminosity without looking dull or gray.

4. Hardware Optimization: Storage Space and Device Speed for Mobile Editing
When you are editing Antarctica images in Lightroom on a laptop inside your ship cabin, your computer’s internal hardware will face a massive bottleneck. Processing hundreds of high-resolution RAW files daily—especially when utilizing Lightroom’s AI-driven masking tools, noise reduction, or stitching large panoramic ice landscapes—demands extreme read and write speeds. If your machine is poorly optimized, your editing workflow will grind to a frustrating halt.
The Internal Drive Crisis (The 20% Rule): Never use your laptop’s internal hard drive as the main storage dump for your raw expedition files. For your operating system and Lightroom to run smoothly, your computer requires ample “scratch disk” space—temporary virtual memory. As a rule of thumb, you should always keep at least 20% of your internal SSD space completely empty. If you clog your internal drive with massive polar folders, Lightroom’s rendering speeds will crater, causing systematic lag and potential app crashes.
Bus-Powered NVMe Speeds vs. Traditional Storage: Not all external drives are created equal. To edit seamlessly directly off an external drive without copying files to your desktop, you must use bus-powered NVMe SSDs connected via high-bandwidth ports (Thunderbolt or USB 3.2 Gen 2). Standard external SSDs top out around 500 MB/s, but modern NVMe drives transfer data at 1050 MB/s to over 2000 MB/s. This speed difference determines whether a 45-megapixel RAW file or an AI sky mask renders instantly, or takes five agonizing seconds to load every time you switch images.
The Smart Preview Strategy for On-Board Editing: To maximize both space and processing speed while on the ship, generate Smart Previews upon import. Smart Previews are lightweight, fully editable proxy files that take up a fraction of the space of a full RAW file. You can instruct Lightroom to build and use these smart previews for editing, allowing your laptop’s processor to fly through adjustments without constantly pulling data from your external drives. When you return home to your main desktop setup, your edits will instantly sync back to the master RAW files.

5. The Pre-Expedition Setup: Editing in Ushuaia
Learning to balance complex masks, isolate color channels, and manage a high-volume catalog of thousands of high-resolution images can be overwhelming when you are trying to do it on a rolling ship in the middle of the ocean. If you wait until you are crossing the Drake Passage to figure out your post-processing strategy, you will lose valuable time that should be spent resting or shooting.
Because almost all Antarctica itineraries require a mandatory 24-to-48-hour buffer stay in Ushuaia prior to embarkation, you have a perfect, high-yield opportunity to refine your digital workflow before you ever set sail.
Our daily Photo Tours in Ushuaia and custom Photography Tours in Tierra del Fuego aren’t just field trips—they are comprehensive technical workshops. At the end of our shooting sessions along the rugged Fuegian coastlines, we can sit down 1-on-1 for a dedicated digital post-processing diagnostic session:
Essential Editing and Masking: We will edit the images made in Tierra del Fuego together to review essential editing tools and masking.
Catalog Organization: We will audit your laptop’s catalog settings to keep an organized workflow.
Histogram & Exposure Verification: By reviewing your field shots on the monitor, we can cross-reference your exposure habits with your editing style, ensuring your highlight-preservation techniques are completely flawless before you hit the ice.
Partnering with an experienced photographer in Ushuaia gives you the ultimate peace of mind. When your ship finally charts its course south, you won’t just be a photographer hoping for good results—you will be fully prepared for editing Antarctica images in Lightroom with a locked-in digital workflow, ready to bring home the definitive, museum-grade portfolio of a lifetime.
👉 If you want to get a head start on post-production before your trip, we’re also available for private, personalized online lessons—and not just with Lightroom. We also work with Photoshop, Skylum Luminar, DXO, Capture One, and Tony Kuyper’s luminosity masks.