
Stepping off an expedition vessel onto the Antarctic Peninsula is a watershed moment in a photographer’s career. The sheer scale of the landscape—towering glacial walls, monumental icebergs sculpted by catabatic winds, and sprawling colonies of King Penguins—presents a visual spectacle unmatched anywhere else on Earth.
Yet, the very elements that make Antarctica so visually breathtaking also make it one of the most logistically hostile and technically demanding environments on the planet for high-end digital imaging systems. Sub-zero temperatures, corrosive salt spray, intense ultraviolet reflections, and rapid weather shifts will expose any weakness in your gear or your field workflow.
True preparation goes far beyond a packing checklist. It requires an advanced understanding of environmental management, system configuration, and physical adaptation. This comprehensive guide on How to Prepare Your Camera Gear for Antarctica outlines the exact technical methodologies required to safeguard your equipment and ensure flawless execution from the moment you clear the Beagle Channel to the Drake Passage, and your shore landings in the South Shetland Islands.

Photography Gear for Antarctica Cruise
Selecting and configuring the right equipment matrix is the foundation of a successful polar expedition. Because you will be operating in remote environments with zero access to camera repair shops or replacement gear, redundancy, weather sealing, and focal length versatility are non-negotiable.
The Two-Body System Configuration
Never travel to the White Continent with only one camera body. Dust spots, mechanical failures, or a single accidental splash of saltwater can instantly compromise your primary system. Furthermore, swapping lenses on an open, wind-whipped rubber boat during Zodiac excursions invites salt spray and ice grit directly onto your exposed digital sensor.
The Optimal Strategy: Equip yourself with two weather-sealed, high-resolution mirrorless or DSLR bodies. Keep a telephoto zoom mounted to your primary body and a wide-angle or intermediate zoom permanently attached to your secondary body. This allows you to instantly pivot from capturing a wide landscape of the Antarctic Peninsula to tracking a breaching whale without ever exposing your interior sensor to the elements.
Essential Focal Lengths for Polar Environments
Antarctica requires both extreme reach to document wildlife safely and wide fields of view to capture the immense scale of the landscape.
The Telephoto Workhorse (100-400mm or 200-600mm): Wildlife regulations strictly prohibit approaching nesting birds or marine mammals closely. A high-quality telephoto lens allows you to capture intimate details of King Penguins, nesting petrels, and fur seals while maintaining a respectful, legal distance.
The Landscape Essential (16-35mm or 24-70mm): To frame monumental icebergs and towering glacial fjords, a fast intermediate zoom is vital. Ensure your wide lenses are equipped with robust lens hoods to block stray ultraviolet glare and protect the front element from driving sleet.
Support Systems and Filtration
Monopods vs. Tripods: While a sturdy carbon fiber tripod with a weight hook is valuable for ship-deck photography, it is frequently restricted on fragile shore landings to protect moss beds and wildlife pathways. Pack a rugged, lightweight monopod or practice advanced handheld shooting forms to ensure stability when tripods are prohibited.
Protection Filters: Mount high-quality UV or clear protector filters on all glass elements. It is far safer to aggressively clean dried salt spray off a replaceable filter than to scratch the advanced coatings of a premium lens element in the field.
Cold Weather Photography Tips: Antarctica Climate Control
The physics of extreme cold introduce unique challenges to modern mirrorless and DSLR systems. While modern professional bodies are exceptionally resilient to low temperatures, the rapid transition between microclimates can be dangerous.
The Physics of Internal Condensation
The primary threat to your camera’s electronics is not the ambient outdoor cold, but the indoor heat of the vessel. When a cold camera body (exposed to sub-zero temperatures for hours) is brought directly into the warm, humid environment of a ship’s lounge or cabin, moisture will instantly condense out of the air onto the cold surfaces. Crucially, this condensation forms internally on the sensor, circuit boards, and rear elements of your lenses, potentially causing issues.
The Hermetic Bag Protocol: Before stepping inside the ship or boarding the transit craft back to the vessel, place your camera body and lens inside a heavy-duty, airtight plastic Ziploc bag while still outdoors. Seal it tightly, trapping the cold, dry Antarctic air inside. Once indoors, leave the gear inside the sealed bag for a minimum of 60 to 90 minutes. This allows the temperature of the equipment to rise gradually to room temperature. Any ambient moisture will condense on the outside of the plastic bag, leaving your delicate internal components completely dry.
Battery Optimization in Sub-Zero Climates
Lithium-ion batteries rely on liquid chemical reactions to generate electrical currents. Sub-zero temperatures slow these chemical reactions down, causing voltage drop and a dramatic decline in effective battery life—sometimes reducing operational capacity by up to 40-50%.
The Body-Heat Rotation Matrix: Always carry a minimum of three to four spare batteries per shooting session. Keep your active spares stored in an inside pocket of your intermediate clothing layers, directly utilizing your core body heat to preserve their chemical equilibrium. When the battery indicator in your camera drops significantly, swap it out for a warm battery. Do not discard the “drained” battery; as it warms back up in your pocket, its voltage will recover, allowing you to use its remaining capacity later in the day.
EVF vs. LCD Management: To maximize power efficiency on long shore landings, disable the rear LCD screen entirely. Configure your mirrorless system to operate solely via the electronic viewfinder (EVF) with an aggressive auto-sleep timer set to 10 or 15 seconds.

Mastering Exposure: Photography Gear for an Antarctica Cruise
The reflective properties of ice and snow introduce severe metering complications that consistently frustrate uninitiated photographers.
Overcoming the 18% Gray Calibrations
Your camera’s reflective light meter is engineered to analyze a scene and calculate an exposure based on a global average of 18% middle gray. When your frame is dominated by pristine white snow packs, glaciers, or massive floating icebergs, the camera misinterprets the immense brightness as overexposure. Left to its own automatic calculations, the camera will aggressively stop down the exposure, rendering your crisp white Antarctic landscape as a dull, underexposed, muddy gray.
Manual Exposure Compensation: To maintain the true luminosity of polar landscapes, you must proactively apply positive exposure compensation. Depending on the intensity of the cloud cover or direct sunlight, you will regularly need to overexpose your shots by +1.0 to +2.3 EV stops.
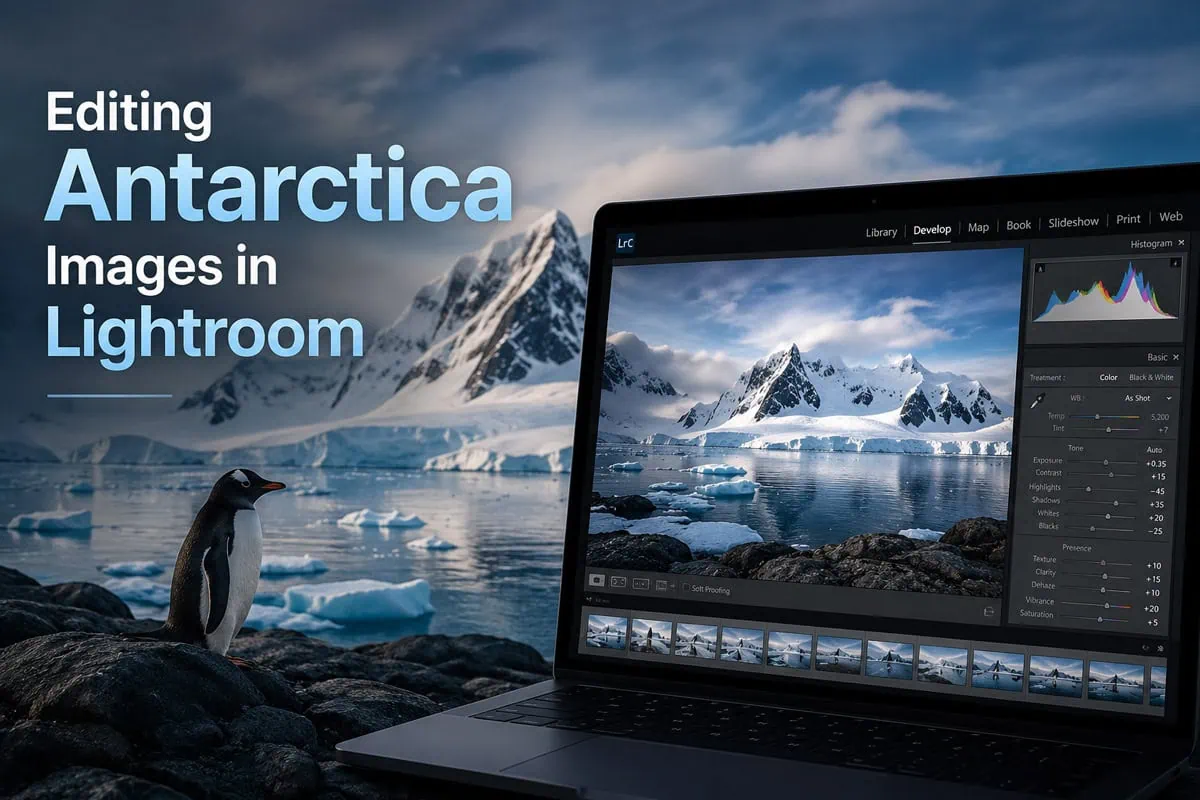
The Zebra Pattern & Histogram Workflow: Never rely on the visual playback of your rear LCD screen to judge exposure, as your eyes will be adjusted to intense ambient glare. Instead, shoot with the live histogram enabled, pushing the data curve as far to the right as possible without clipping (“Exposing to the Right” or ETTR). Additionally, configure your viewfinder’s Highlight Warning (Zebra Patterns) to trigger at 93-95% brightness, allowing you to visually monitor and preserve the delicate structural textures within the ice and snow highlights.

Antarctica Expedition Photography Guide: Optimizing Polar Clothing
A highly overlooked aspect of polar photography is the physical restriction imposed by survival gear.
The Dual-Layer Glove Matrix
Operating advanced camera controls, tactile custom dials, and small joystick selectors while wearing heavy, insulated polar clothingkeys and thick windproof mitts is virtually impossible. Yet, exposing bare flesh to sub-zero winds for even thirty seconds can result in rapid frostbite or loss of fine motor skills.
The Strategy: Implement a strict two-layer glove system. Your base layer must be a form-fitting, wind-resistant liner glove equipped with highly responsive touchscreen-compatible fingertips. Your outer layer should be an insulated photography mitt featuring a fold-back thumb and index finger flap secured by magnets. This allows you to expose only your primary control fingers for brief technical adjustments before sealing them back away from the elements.
Antarctica Cruise Photography Tips: Stability on Zodiac Excursions
In Antarctica, you will rarely find yourself shooting from a stable, stationary tripod. Environmental protocols tightly restrict the placement of tripods on fragile shore landing sites to protect local flora and wildlife habitats, while a significant portion of your portfolio will be captured from moving vessels.
Optimizing for Zodiac Excursions
Some of your most profound wildlife encounters and ice wall compositions will occur during Zodiac excursions. Maneuvering through choppy waters while tracking fast-moving marine life or navigating fields of brash ice requires distinct stability methodologies.
High Shutter Speed Thresholds: To counteract the combined vibrations of the Zodiac’s outboard engine, ocean swells, and your own hand-held posture, you must abandon traditional shutter speed formulas. Elevate your baseline shutter speed to a minimum of 1/1600s for general landscapes and up to 1/2500s or 1/3200s when tracking dynamic wildlife behaviors, compensating for the light loss by widening your aperture or utilizing modern, low-noise Auto-ISO parameters.
Stabilization Modes: Ensure your lens or in-body image stabilization (IBIS) is set to the correct mode. For shooting from moving boats, select the specific stabilization mode designed for panning or erratic motion tracking (typically Mode 2 or Mode 3 on professional glass), which ignores predictable vertical or horizontal movement while actively dampening high-frequency micro-jitters.

How to Prepare Your Camera Gear for Antarctica: The Ushuaia Dry Run
The vast majority of Antarctica expeditions require a mandatory 24-to-48-hour buffer stay in Ushuaia prior to embarkation, a policy designed by cruise lines to safeguard itineraries against international flight delays. For the serious photographer, this buffer window shouldn’t be wasted—it represents your single most valuable preparation asset.
Testing brand-new camera bodies, uncalibrated telephotos, unfamiliar layering systems, or a new data-redundancy workflow for the first time while standing on a rolling rubber boat in the middle of the ocean is an immense financial and creative risk. You need a safe, high-yield environment to conduct a full technical dress rehearsal.
By joining a dedicated, Professional Ushuaia Photographer for a private, field-driven diagnostic session, you convert your mandatory buffer days into a tactical simulation of the White Continent.
Our private Photo Tours in Ushuaia and tailored Photography Tours in Tierra del Fuego are engineered explicitly around the rigorous logistical demands of the polar traveler. Together, we step into the wild, wind-scoured coastlines of the national park, the jagged Andean vantage points of Paso Garibaldi, or the pristine, historic estancias to put your equipment through its paces.
During our private field sessions, we work 1-on-1 to refine the exact skills you will depend on down south:
We practice technical dial adjustments and menu navigation while you are wearing your actual polar clothing and technical glove matrix.
We calibrate your camera’s deep-learning AI subject detection and autofocus tracking parameters on rapid local marine birds, ensuring you can flawlessly capture King Penguins or breaching cetaceans later.
We run real-time exposure diagnostics across high-contrast coastal landscapes to ensure your highlight-preservation habits are flawless.
Partnering with an experienced Photographer in Ushuaia grants you the ultimate peace of mind. When your ship finally sails down the Beagle Channel and enters open water, you won’t be second-guessing your gear, your settings, or your physical workflow. You will be fully prepared, fully calibrated, and ready to capture the definitive portfolio of your lifetime.
➡️ Secure Your Pre-Cruise Technical Masterclass
Ensure your equipment and skills are fully optimized prior to embarkation. Explore our bespoke Private Photo Tours in Ushuaia & Tierra del Fuego and coordinate a private session tailored precisely to your expedition timeline.